Super Fresh
Harvested and shipped within days when you order.
Fair Prices
We eliminate extra steps so you get better value.
Rated for Real Life
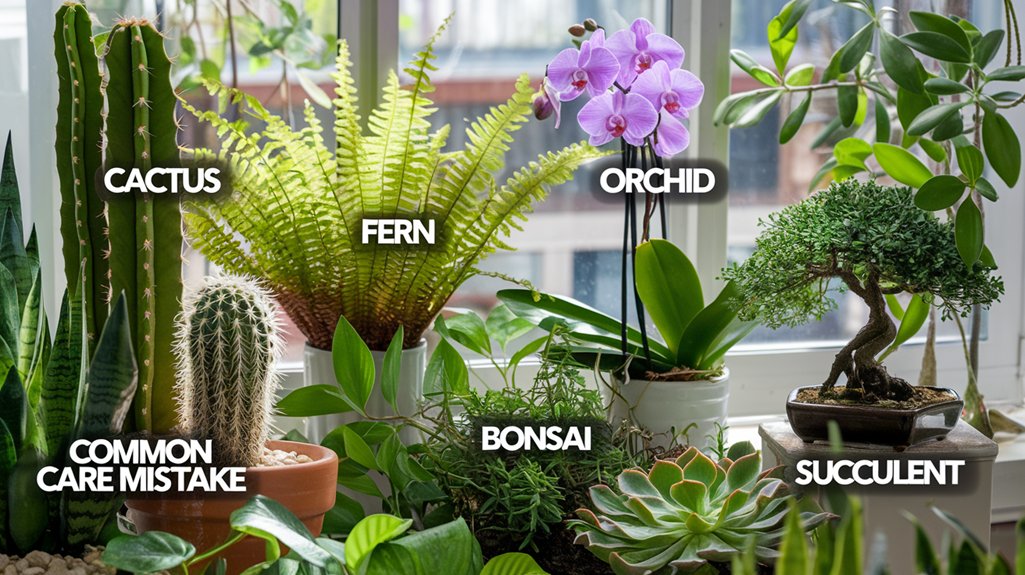
Clearly labeled so you can choose the right plant fast.

First, identify your plant using apps or horticultural groups for accuracy. Research its specific care requirements from reliable sources. Quarantine the plant for a week in a separate area to check for pests. Acclimate it by monitoring its response to light and humidity; expect minor leaf drop. Establish a watering routine by checking soil moisture and ensuring proper drainage. Regularly assess for signs of distress. Discover additional tips to keep your plant thriving.
How do you begin identifying your new green companion? First, leverage plant identification apps or websites to get an initial idea of your plant’s species. These tools can provide you with its scientific name, which is essential for precise care requirements.
Next, compare your plant’s features to online descriptions and images to confirm its identity. Don’t forget the plant care tag if it’s available; it often contains valuable information regarding specific needs.
For additional clarity, join plant identification groups on social media. Engaging with experienced plant enthusiasts can offer insights and support.
If uncertainty persists, take clear photos and consult horticultural experts via email or social media. Their expertise can guarantee accurate identification and effective plant care.
After identifying your plant, it’s time to understand its unique care requirements.
Begin by discarding care tags from big box stores; they’re often inaccurate. Instead, research each plant type by cross-referencing multiple reliable resources. Visit libraries and used bookstores for extensive horticulture books offering detailed care insights.
Focus on understanding specific terms like “bright light,” “humidity levels,” and “soil type” to tailor your plant’s environment accurately. Pay attention to water needs, as common mistakes often involve either overwatering or underwatering.
Embrace a trial-and-error approach, learning from experience to refine your care techniques. Look for upcoming resources or blog posts that provide tailored tips for your plant species, ensuring you’re equipped to meet its unique requirements.
When you bring a new plant home, it’s crucial to quarantine it for at least a week to prevent any potential pest infestations from spreading to your existing collection.
During this period, you’ll want to meticulously inspect for pests. Here’s how to care for your new addition:
Bringing a new plant into your home requires careful acclimation to verify it thrives in its new environment.
Start by isolating your new plant for at least a week to monitor for pests and allow it to acclimate without external interference. Keep it in its original nursery pot during this period, as repotting too soon can stress the plant.
Monitor its response to your home’s light, temperature, and humidity. You might notice leaf drop, a common stress response as the plant adjusts.
After acclimation, check if the plant is root-bound—if so, repotting with a fresh, suitable potting mix might be necessary. Confirm the new conditions match its needs, helping it shift smoothly into your living space.
Once your plant has settled from its initial acclimation, it’s time to identify the perfect location within your home. Start by evaluating the light conditions—determine the direction of windows and any obstructions to classify it as direct, indirect, bright, medium, or low light.
Each indoor plant has specific light requirements, so consult resources like the Lighting 101 Guide or your local nursery for plant care tips.
Establishing a proper watering routine is essential for maintaining healthy plants, as it directly impacts their growth and liveliness. Begin by evaluating the soil moisture. Insert your finger 2-3 inches deep into the soil; if the soil is dry at this depth, it’s time to water your plant. Most plants prefer the soil to dry out between 50%-75% before the next watering to avoid root rot. Guarantee good watering by allowing water to drain from the pot’s drainage hole, preventing excess water. Be mindful of seasonal changes, as plants need less water during colder months. Always use pots with drainage holes to promote healthy root growth.
| Step | Action |
|---|---|
| Evaluate Soil | Finger test: Is the soil dry 2-3 inches deep? |
| Water Thoroughly | Water until excess water escapes from the drainage hole |
| Allow Drying | Let soil dry 50%-75% between waterings |
| Adjust Seasonally | Reduce watering in colder months |
| Guarantee Drainage | Use pots with drainage holes |
To guarantee your plants thrive, regularly monitor and adjust their environment based on observed health indicators.
Begin by keeping an eye out for signs of distress like wilting, yellowing leaves, or brown tips. These symptoms can reveal issues with watering, light, or humidity levels.
Here’s how to maintain ideal plant health:
Congratulations on welcoming a new plant into your home! By identifying your plant and researching its care needs, you’re setting yourself up for success. Don’t skip quarantining and inspecting for pests, as this step protects your plant. Acclimate it gradually to its new surroundings and choose a spot that suits its light requirements. Establish a consistent watering routine and stay vigilant for any signs of distress. Your attentive care will guarantee a thriving, healthy plant for years to come.